Data Import Wizard
The Data Import Wizard is a powerful tool and feature that enables users to efficiently bring external data into their system. With this tool, users can seamlessly import various types of information, including:
- Chart of Accounts
- Companies (Customers and Vendors)
- Addresses and Contacts
- Price Levels
- Items
- Assemblies
- Lots and Serial Numbers
- Units of Measures (UoM)
- Sales Tax Rates
- Salespeople
- Payment Methods
- Projects and Classes
Additionally, the Data Import Wizard allows users to import historical transactions, such as:
- Journal Entries
- Sales Orders and Purchase Orders
- Deposits and Payments
- Sales Invoices
- Bills
- Cash Sales
- Inventory Adjustments
- Item Receipts
- Bank Transfers
- Time Tracking
 If you have questions or need assistance, please contact us – we’ll help you import the data.
Highlights
Below are the new features of our rebuilt Data Import Wizard for Lists and Transactions.
- Ability to import multiple related lists and transactions in one import session with multiple file sources, and improved UI/UX with guided messaging.
- Automatic default mapping for *.iif files.
- Guided Messaging and Wizards to make all your import sessions fast and easy.
- Continue to your Last Saved Import - if you get interrupted you can finish later and not lose you work!
- New Mapping Preview Spreadsheet with options for Records Handling: Update Only, Create Only, Create and Update. Here, you can also manually edit source records and assign the default value.
- Manage Staging Duplicates - this feature enables you to assign fields between multiple duplicate records then merge into one.
- Mapped Record Compare & Select - this feature enables you to compare and assign fields between a mapped existing AccountingSuite™ record and its Staging record.
- New Mapping Rules - this feature allows you to create a rule for specific fields that can be applied to: that import only; for that data type and all future imports of that type; as well as to all data types for all future imports.
- Activity Log - this feature shows a clear history of all actions for each import session.
- Built-in special character handling for source files.
- Flex Date default format and multiple date configuration options. Never error on date formatting issues!
- Informative data relationship and tutorial diagrams, as well as field samples to visualize where the field shows in AccountingSuite™.
- Rebuilt User Interface and Step tabs guide you through your imports!
How to access the Data Import Wizard?
From the AccountingSuite™ Homepage, go to Admin Panel → Data Import Wizard.
Usage
The instructions below will guide you on how to use the AccountinSuite™ Data Import Wizard.
There are three stages of a data import session:
- Import Types and Relationships - Defining the data types (Main and Related) that you would like to import and their relationships. (A)
- Mapping and Staging Data Processing - Choosing your file sources, preparing/mapping, and processing the data in a Staging environment. (B)
- Creating, cleaning up and exploring AccountingSuite™ Data - Bringing the data into AccountingSuite™, cleaning up/deleting Staging records, and exploring the newly created and/or updated records in AccountingSuite™. (C)
Stage A: Import Types and Relationships
Choose Main Data Type
This is the main data set that you are importing. Lists (e.g., CoA, Customers, Vendors, Items, etc.) or historical transactions (e.g., Payments, Deposits, Sales Invoices).
The Related Data Type(s) are data sets that relate to the main data set. For example, Item Categories is a list of values shown in a dropdown on the Item card. So, if you are importing Items, you can also import Item Categories. To select this Related Data, on Tab 2 (Data Relationships) check the checkbox next to the related data that you'd like to import together with your main data type. When you are done, click Next.
This screen shows which Main Data Type you have selected (1) and allows you to choose Related Data Type(s) to import at the same time (2). There's also a diagram of the data relationships that can help you understand how it all fits together once imported (3). You can click objects in this visual representation to see the screen in AccountingSuite™ where the data exists once imported.
Download Import Templates
You can also make your data import process easier and efficient by utilizing Import Templates. These templates serve as a foundation for organizing your data before importing it into the system. Download or export import templates on the Tab 2 (Data Relationships) window, or see the attachments included on this article.
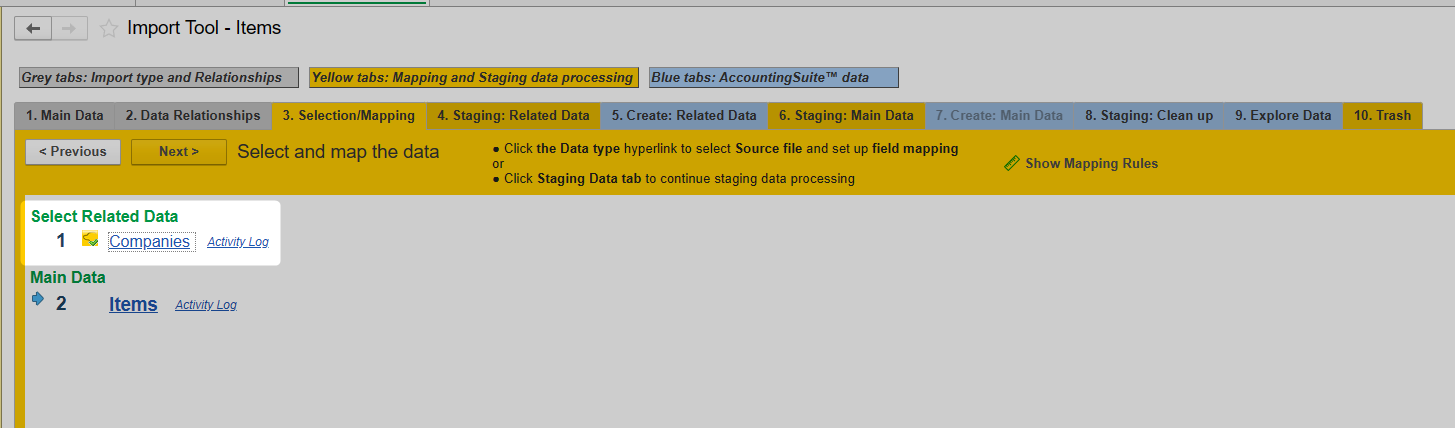
Stage B: Selection and Mapping
Selection/Mapping
In Stage B you will be selecting the files that contain the data that you are importing or editing the lists manually (see screenshot below). Start with the data type that is numbered 1 and work your way down in the order listed - follow the blue arrow.
Please note that the order of import may be different than the order that you chose in the previous screen. 
The order in which data is imported is very important. Let the system choose the best order for your situation.
Click the hyperlinked data name. The system will ask you how you want to enter the data:
- Enter it manually.
- Choose a file from your computer. The Data Import Wizard supports these file formats, *.csv, *.txt, *.xls, *.xlsx, and *.iif.
- Reuse a file that has been used in the Import Wizard previously (holds up to five files).
- Restore your recent data import session.
Select the method and click on it. If you chose manually, you will be taken to a templated spreadsheet where you can enter or cut and paste your data (see Entering Data Manually below). If you chose file, this is where you will upload your file. Instructions for each choice are below.
Entering Data via an uploaded file
If you chose to Enter Data via an uploaded file, you will be prompted for the file. Select the file from your computer and click Ok.
- Map the AccountingSuite™ fields to the source file column. Map the source file manually to AccountingSuite™ fields or if you're using an import template downloaded from AccountingSuite™, you can map the fields by headers. Double-click the cell in AccountingSuite™ field column to map it to the source file columns (1).
- Choose an option from the Records Handling dropdown (2). You can choose to: Update Existing and/or Create AccountingSuite™ Records which will look to see if the item exists and update it, or create a new record if it is not found, Update AccountingSuite™ Records Only which will only update existing AccountingSuite™ records but not create any new ones or Create AccountingSuite™ Records Only which will create new records and ignore records that already exist in AccountingSuite™.
- For each row in the table, look at the data from your spreadsheet (3) and pick the AccountingSuite™ field to import the data to (4). You can see a sample of the data by clicking Show Sample (5).
- Repeat Step 3 for each column of data in your spreadsheet.
- When you are done, click Save/Save and Close (6).
- After saving, click Import to Staging/All Records. The Import Wizard will open to the Staging dashboard and notify you of errors between staging records (like duplicates between staging records).
If you would like to assign default values for a field (the value is the same for every record imported) select Assign Defaults from the Show Fields dropdown button and assign the values for each field that needs a default. Defaults can also be assigned in the Mapping Preview spreadsheet.
Entering Data Manually
If you chose to enter data manually, or to cut and paste, you will be presented with a screen that looks like a spreadsheet (Mapping Preview). See the screenshot below.
To enter data, either copy and cut from the source and paste it into the spreadsheet or click inside of a cell (1) and start to enter the data manually. Tab through each row, entering data in each column until you have entered all of the data.
Things to note:
- You can add additional columns by clicking the Add Columns link (2) and checking the fields to add to the import.
- If the field is required, it will be noted in the heading, second row (3).
- The type of data the system is expecting is noted in the header, row 3 (4).
- Assign default value for a field (the value is the same for every record imported) in the header, row 5 (5).
- Display preferences and scrolling can be achieved using controls on the bottom (6).
- You can search for records using the search box (7).
When you are done entering the data, click Import to Staging (8) to open and proceed to the Staging dashboard. The Staging dashboard and notify you of errors between staging records (like duplicates between staging records).
Staging Data
The Staging dashboard notify and shows you if there are errors between the staging records (e.g., duplicates between staging records, missing or empty required fields). Upon Staging, the import records are automatically verified with other staging records. To verify against the records in AccountingSuite™, follow the steps below.
- Check the checkbox next to the records or the Select All button to verify them and map to existing AccountingSuite™ records - so click Verify Staging Data. You cannot import unless you do this step.
- Once Verified the Import Wizard will notify you if there are any errors between the Staging records and any existing AccountingSuite™ records and guide you to fix them, you can also delete records at this step.
- Once you are done with the verification, and done fixing any errors, merging duplicates, creating a Mapping Rule, etc. click Create AccountingSuite™ Data.
Each data type that you have successfully imported will have an AccountingSuite™ logo dog head next to it. Data types that you have selected a source file and mapped have different icons next to them both in the Selection/Mapping tab and the Create Tab(s). These icons show in several tabs throughout the Import Wizard to guide you.
STAGE C: Records come into AccountingSuite™, Staging Clean up and Exploring the Data
Create Data
On the Create Data tab(s), click Import Staging Data into AccountingSuite™ to import all the staging records into AccountingSuite™. Data will be created and updated based on the information in the Staging tables.
At this stage the records are brought into AccountingSuite™ and you see an informative dashboard of what records were created, which ones were updated, and what records errored on import. You will also see a list of all data types imported, their status and record count.
Staging Clean up
For Staging Clean up, it's a good idea to delete the records if you are done with them - unless you would like to reuse these records later!
Choose the data type you want to delete the staging records for, click Move Staging Records to Trash dropdown, select All (for example) and all the staging records will be moved to the Trash tab where there's an option to delete the staging records permanently.
Exploring Imported Data
And lastly, you can explore all your new data! These links take you only to the data you just created in AccountingSuite™ for a clear picture of what you just imported!
How-to Video
In addition to the step-by-step instructions, we’ve got you covered with a helpful video tutorial on using the Data Import Wizard. You can watch it below or by following the link: Data Import Wizard How-To Video
The order that you import your data is very important. Many things are dependent on other data being in the software before being imported. Here is a general order of operations when importing data.
Getting Started and Dropdown Lists:
Chart of Accounts
Payment Terms
Price Levels
Salespeople
Payment Methods
Companies (Customers and Vendors)
Addresses and Contacts
Sales Tax Rates
Locations
UoM Sets
Units
Item Categories
Items
Lots
Serial Numbers
Assemblies
Price Matrix
Projects
Classes
Historical Transactions:
Journal Entries
Payments (Expenses and Payments without Bills)
Sales Quotes
Sales Orders
Purchase Orders
Item Receipts
Inventory Adjustments
Assembly Builds
Bills
Purchase Returns and Vendor Credits
Bill Payments
Cash Sales (POS & Sales Receipts)
Shipments
Time Tracking
Sales Invoices
Sales Returns and Customer Credits
Cash Receipts
Deposits
Bank Transfers